Search Engine Optimization (SEO)

Google is constantly evolving and offers increasingly advanced tools as it updates. As part of its ongoing efforts to bridge the gap between individuals and businesses, the Mountain View giant created Google My Business in 2014.
This feature was introduced to help companies track information about their brand and appear, among other places, in local search results.
It notably allows companies to centralize their information in a single space, keep it up to date, promote it and receive feedback and reviews from their customers.
Google My Business is now the standard for any company that wants to improve its visibility and attract more customers.
In this article, our local SEO agency explain step by step the different actions to follow to create a Google My Business.
Table of content
How to create a Google My Business listing
Contrary to what you might think, it's very easy to set up a Google My Business listing. The process is actually very similar to creating a profile on social media. The only thing you need is general information about your company and a little spare time.
The information you provide will then be indexed on Google's search network and Google Maps.
Google uses three factors to rank a Google My Business listing on its map and search network:
1- The relevance of the information provided (title, description, etc.)
2- The importance of the business, based on its popularity (reviews, links, etc.)
3- The proximity between the searched location and the user's position.
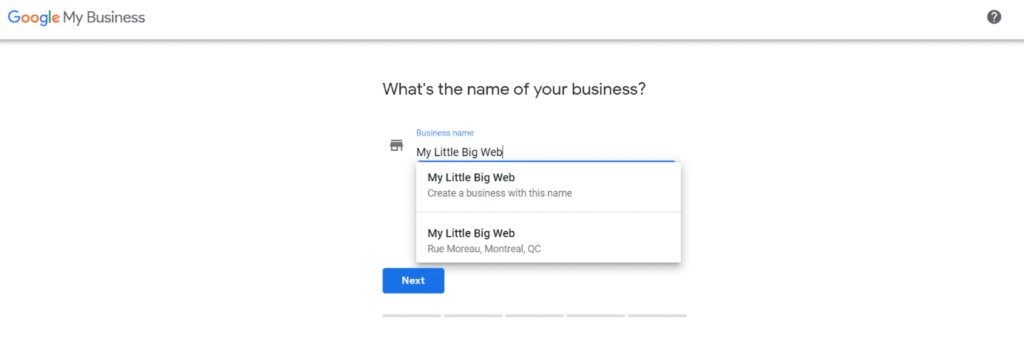
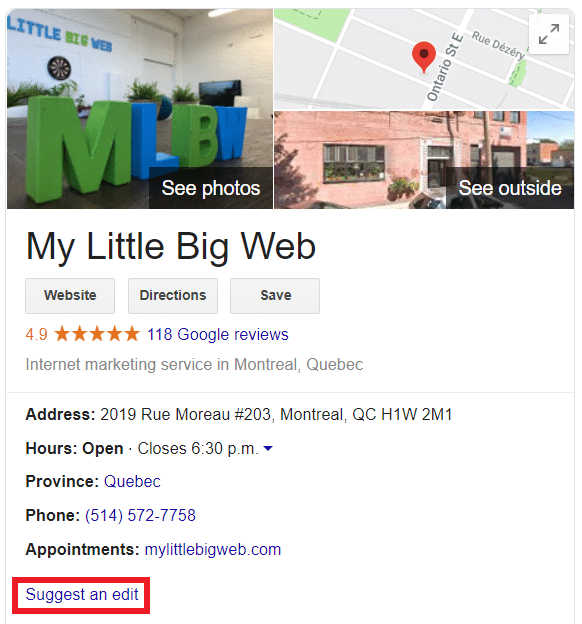
Before you get to the heart of the matter and get an idea, here's what your business card should look like once you've configured it. For example, if a person is searching for "My Little Big Web", the following information is displayed directly to the right of the search results.
Pretty nice, isn't it? Without further ado, here are the steps you should follow to create a Google My Business listing that you can be proud of!
First, go to Google My Business, then click on "Start Now". If you haven't already done so, sign in to your Google Account (or create one if you don't have one).
You should then land on the following page:
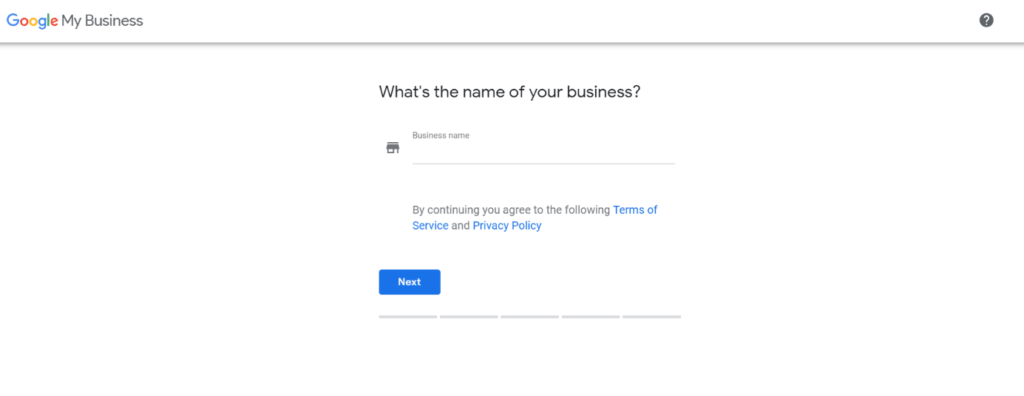
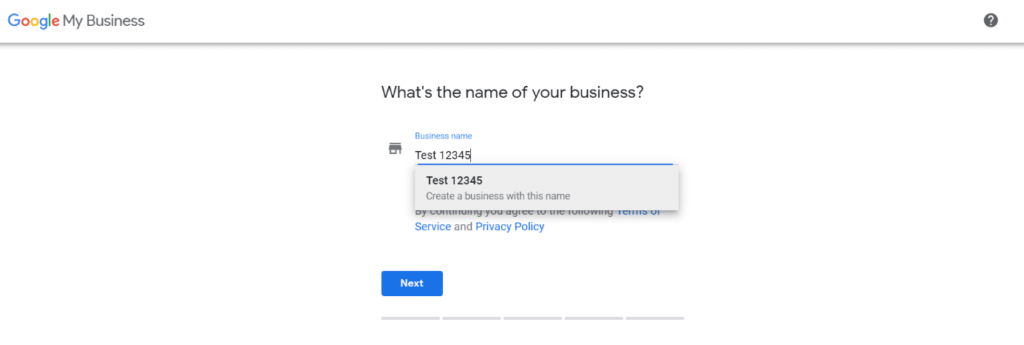
Fill in the empty form with the name of your company. Check if it is suggested in the list. If it is, you will be able to claim your right of ownership on the listing.
Please note that it is possible that someone else has already claimed the right to your listing. If so, go directly to the section "What if someone has already claimed ownership of my business?" Otherwise, you can continue.
If your company name does not appear, you will need to click on the "Create a business with this name" option and go through a few steps (location, areas served, region, business category, contact information, etc.) to access the dashboard for your listing.
Important: for all of the steps that follow, we recommend that you accurately copy the information that is already on your website (if you have one) to avoid any inconsistency that could confuse users (and Google).
For the first question: "Do you want to add a location customers can visit, like a store or office?", answer "Yes". This will allow your business to be displayed on Google Maps.
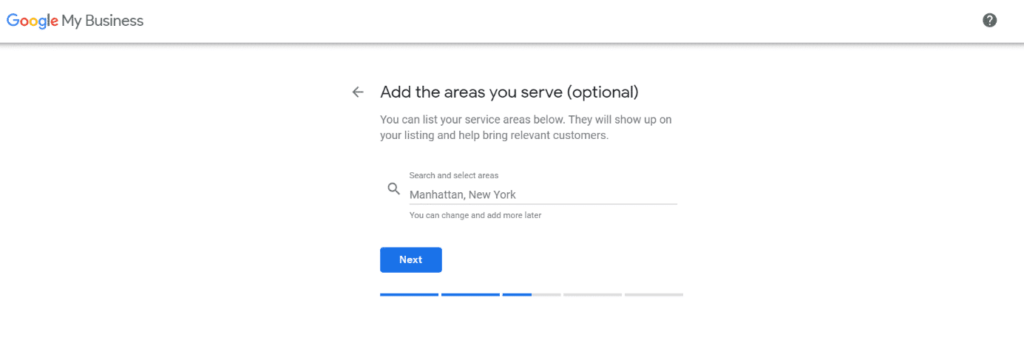
You will then be asked if you offer your services outside your institution. It is up to you to answer depending on the services you offer. If you answer "Yes", the screen below will appear and you will need to add your service areas. If you answer "No", skip this step.
Then, you will have to fill in the category that best describes your business. Categories are used to describe your company and to allow you to connect to customers who are looking for the type of service you offer.
Avoid adding several main categories to describe all your products and services, only one is enough. If you wish, you can add secondary categories to specify the type of service you offer.
Note that it is impossible to create your own category, so choose the most appropriate category from the list.
Once this is done and you are confident of your choice, click on "Next" and enter your contact details: phone number, website URL.
Note that if you do not have a website, you can use a web design agency to create your website.
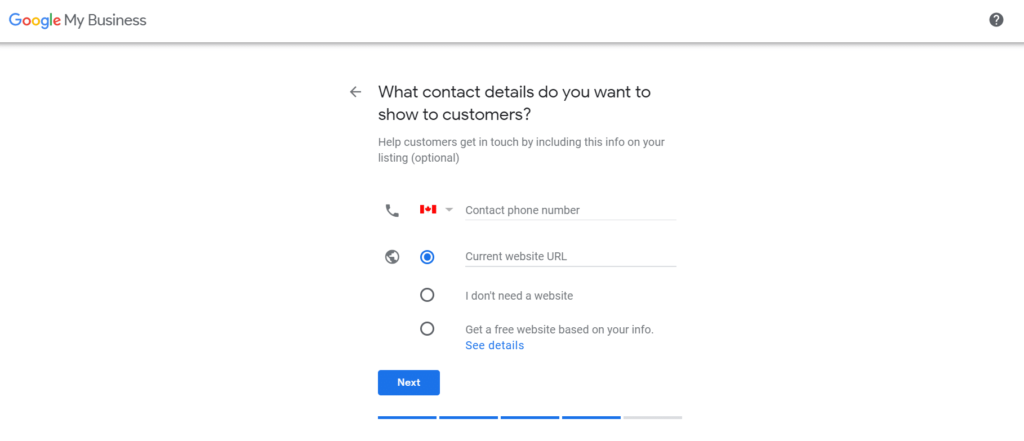
Although this step is considered optional by Google, don't overlook it. The more complete your profile is, the more likely you are to achieve tangible results.
Moreover, if you don't, the options left blank can be filled in by anyone, even your competitors...
Finally, you will be asked if you would like to receive personalized recommendations and advice to improve your business visibility on Google. We recommend ticking "Yes". If you no longer want this option, you can disable it at any time.
Once you are done, your listing will be reviewed by Google to confirm that the information you have provided is correctly associated with your business.
Once your request has been approved, you can configure your listing as you wish. We will show you how to optimize it in the relevant section.
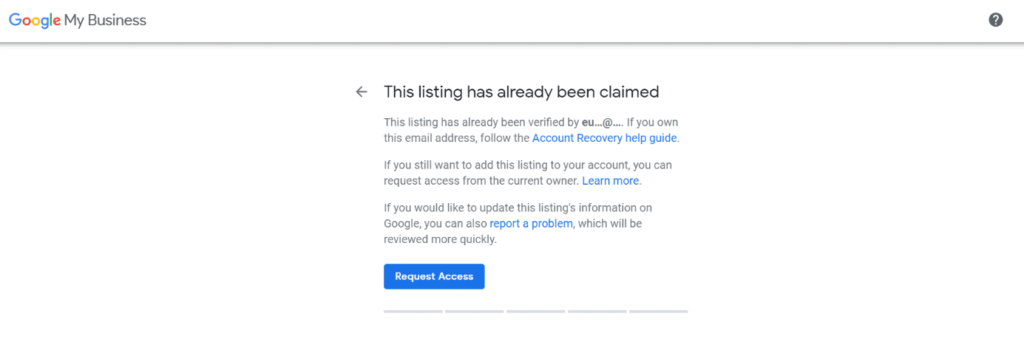
What if someone claimed ownership of my business?
Have you requested access to your company's listing, but someone seems to have already claimed it and the message below appears on the screen? Don't worry, this can be fixed
Business listing with a current location
- Click on "Request Access".
- Fill in the form, taking care to be as precise as possible and specifying the level of access you want. Choose "Owner" if it is your company.
- Then click on "Send". The current owner of the form will receive an email notification inviting them to contact you. On your side, you will receive a confirmation email.
Business listing for a specific area
- Fill out the property claim form in its entirety, using your company's relevant data.
- Then click on "Continue".
- Then enter your contact information to begin the verification process by mail. This takes a few days.
- Once your business has been verified, the next time you connect to Google My Business you will see a "Property Conflict" window indicating that the claimed location is a duplicate.
- Click on "Request Access". The current owner of the listing will receive an email invitation to contact you. You will receive a confirmation email indicating that your request has been received.
What next?
Once you have claimed ownership on a listing, the current owner will have seven days to respond to you. If you want to track the status of your request, you can log into your Google My Business account or you can click on the link provided in the email confirming your request.
If your request is approved: a confirmation email has been sent to you. You can now manage your Google My Business listing.
If your request is refused: you can still suggest changes to your listing. However, if this situation is not convenient for you, in some cases you can challenge the refusal.
If you receive no answer: if the seven-day deadline is exceeded, you can take possession of the listing. To do this, connect to Google My Business and click on "Take possession" or "Check". If these options are not displayed, this means that the master listing cannot be transferred to you.
Optimize your listing for SEO
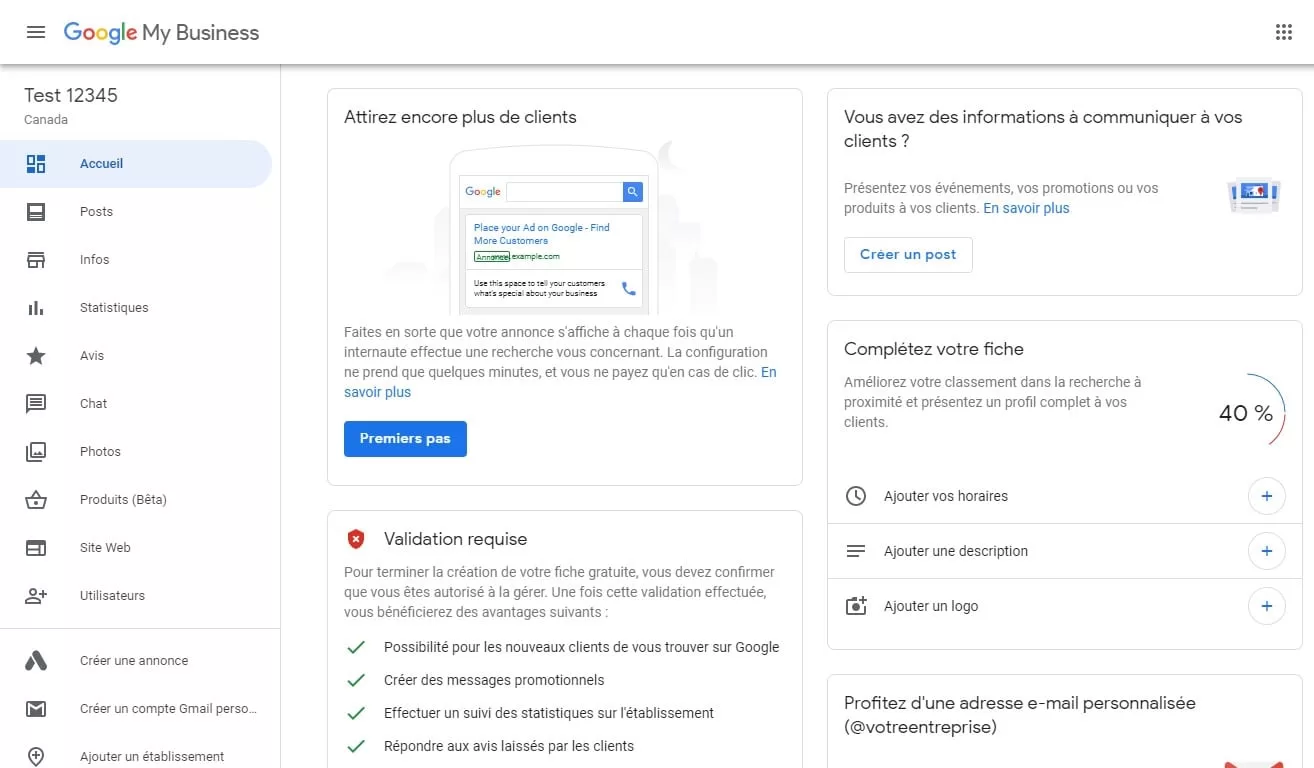
Everything revolves around the dashboard below. From here, you can manage everything: your posts, your company information, your statistics, your reviews, your photos, etc.
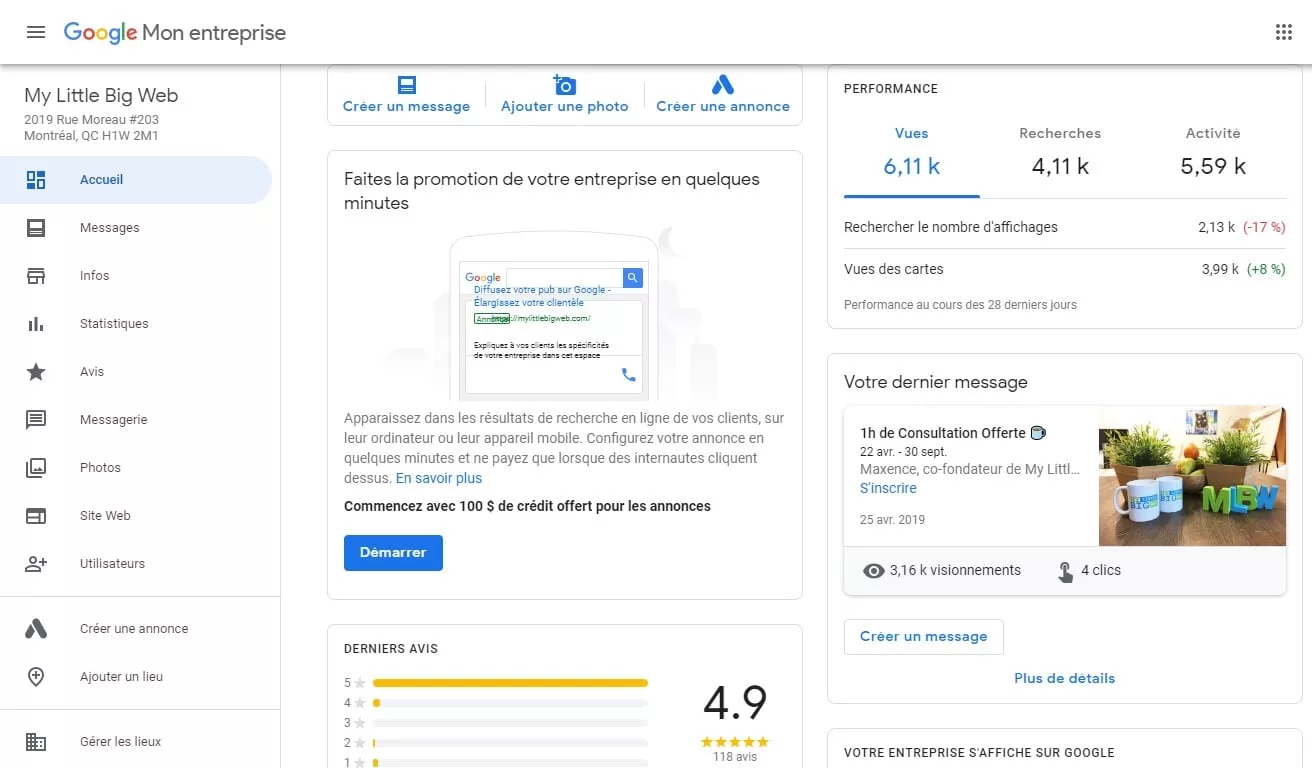
This one is already configured. Here's what yours should look like.
To optimize your listing for your customers and SEO, it should be as detailed as possible. We recommend that you fill in all the missing information such as your hours, business description (use the 750 characters allowed to give as much information as possible), your logo, etc.
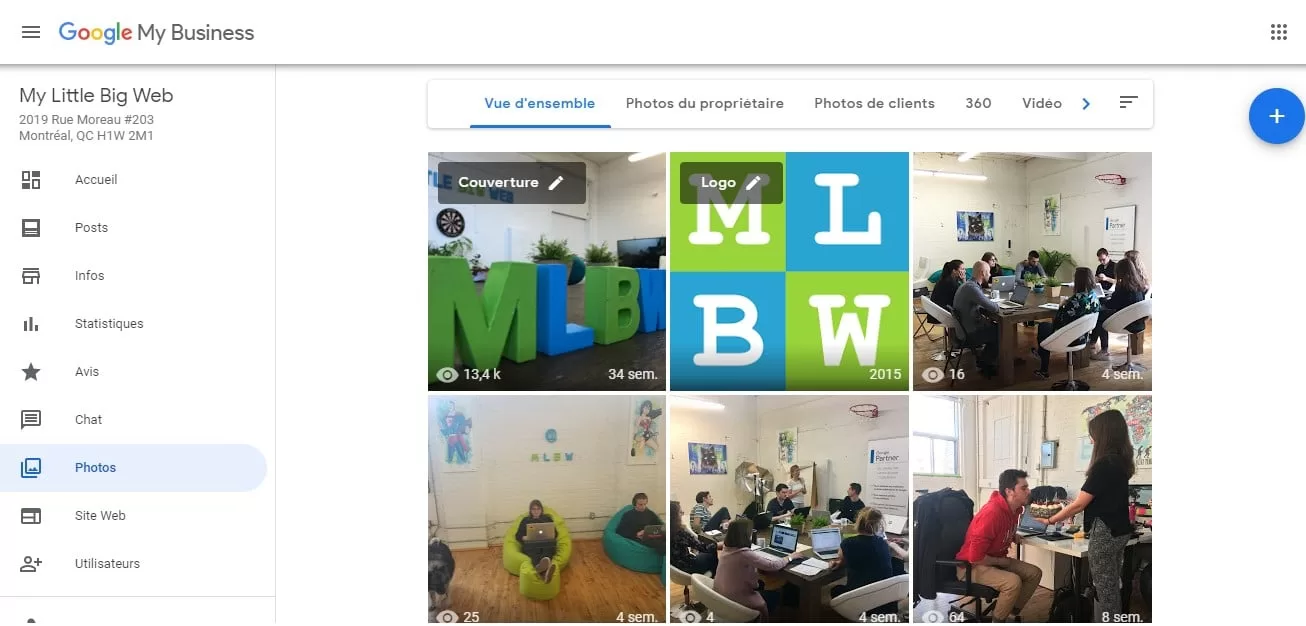
You can also add photos or videos that reflect your work environment from the designated manager. In short, make your profile attractive to stand out from your competitors.
Note: A number of criteria must be met for photos. The format of your images must be in PNG or JPEG. The minimum recommended resolution is 720 px in height and width. The file cannot exceed 5 MB.
As for videos, the rules are just as strict. Your content should last a maximum of 30 seconds. The size of the file cannot exceed 100 MB. There is no minimum recommended resolution, but for the image to be high quality, use a resolution of at least 720p.
Depending on your company and its specific characteristics, you can also add secondary information via the "Info" section: areas covered by your services, specific attributes (wifi, access for the disabled, parking, etc.). If you are organizing an event related to your services, it can also be added.
Congratulations! You have just created a Google My Business listing that is optimized for SEO. But it's not over yet, this is only part of the job.
Regularly update your information and status (opening/closing on public holidays, for example). Use the "Posts" tool to write articles about your latest offers and events and to drive users to your website.
Finally, show that you are responsive by quickly replying to reviews, comments and private messages.
As you can see, it's very easy to create a Google My Business account. However, what really makes a difference is the SEO strategy that you implement afterward.
Conclusion
We hope this article has helped you create your Google My Business listing. The time you spend on it is well worth it. Combine your listing with an effective web marketing strategy and you will quickly see an improvement in your SEO and leads.
Claiming your Google My Business listing early lets you control the information that circulates about your business. This is why we strongly recommend it.
If you have any questions or would like to use our services to improve your SEO strategy, you can contact us via our contact form or call us at 514 572 7758.

Send a message
More reading